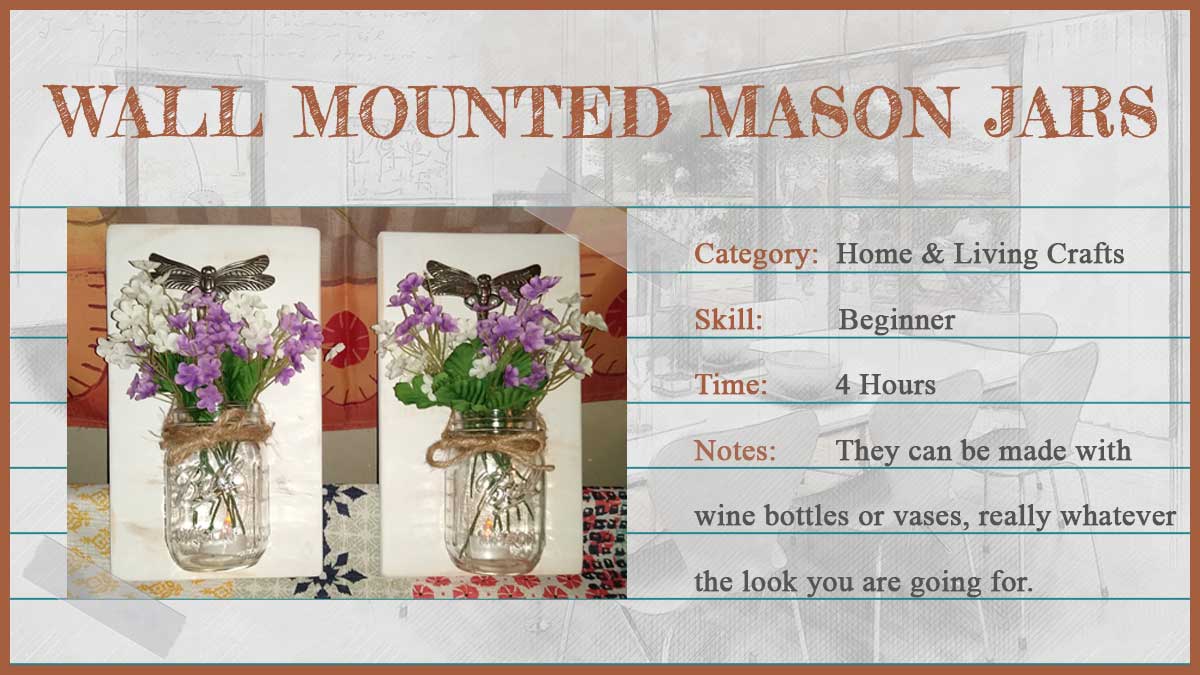
Wall Mounted Mason Jars With Tealights
When I saw these Wall Mounted Mason Jars With Tealights, I knew I had to make them and so here they are. Anything with mason jars is totally me. They give off such a country look and with the sandpaper against the chalk paint it really brings out the farmhouse appeal. I used tealights inside of my jars, but I really like the look of the fairy lights in instead.
I love them because they make great house warming and Christmas gifts. They can be made with wine bottles or vases, really whatever the look you are going for there are many different ways to make them. I promise you can’t go wrong with this idea. So get creative and start crafting your idea for that special friend or even your own space.

How to Make Mounted Mason Jars
Time needed: 4 hours.
Wall Mounted Mason Jars With Tealights
Supplies and Equipment
• 2-1 ft in length, 1/4 in thick wooden boards
• sandpaper
• paint or strainer of your choice (depends on what look you are going for)
• picture wire & 4 screws
• 2 Mason Jars
• twine
• 2 hooks (coat hanger hooks work great)
• floral decor for each mason jar
• battery operated tea lights or fairy lights
- Step One
You can go to your local hardware store and purchase 1 longboard and cut down to 1ft in length for each. If you purchase your board from Home Depot or Lowes they will cut it to the size you need. Most craft stores will sell the boards you need already sanded and ready to either paint or stain. If you purchased your board from a hardware store you more than likely will need to smooth the edges of your board.
Use your sandpaper to smooth out any roughness on your board and around the edges. This does not take much effort and gives it a softer look to the boards and prevents any pesky splinters.
- Step Two
You will now paint your boards. I used chalk spray paint. I applied three coats to my boards. After they were completely dry I took sandpaper and sanded areas on the boards to give it a rustic appeal. This is all up to you and what look you are going for. If you like that look then use the sandpaper to scuff up your paint, if you like them all white or whatever color you chose then you will stop after the paint is dry. There is no right or wrong way to do this step.

- Step Three
Turn your boards over and apply 2 screws to each board evenly. Do not screw in each screw total to the board. Allow space between the board and screw to wrap your picture wire around your screws. After your picture wire is secured, tighten the screws to the board.

- Step Four
Flip your boards back to the front and now you can install your hooks which will hold your mason jars.
Keep in mind that when you are installing the hooks onto your boards you will want to position them in a place where your jar will not hang over the end of the board or too high on the board.
- Step Five
You can use any jars that you would like to use just as long as they have a neck to tie the twine around and hang your mason jar from. I used mason jars for mine because I like the country look it gives. Wrap your twine around the neck of your mason jar several times and tie into a bow.
Cut another piece of twine off to attach to the twine you just wrapped around your jar. I measured the length of the twine so that when I hung the jars from the hooks they would not hang lower than the end of the board. I put floral décor in each mason jar. This is also very optional. There are so many ideas you can use here.
Now your done and can hang your jars from your hooks. I put battery operated tea lights in both jars; however, you can use fairy lights if you desire. I find the fairy lights shine brighter in the dim light. It also gives a twinkling look to your décor.
Get a Printable Version of this Craft
Wall Mounted Mason Jars With Tealights
- 2-1 ft in length (1/4 in thick wooden boards)
- sandpaper
- paint or strainer of your choice (depends on what look you are going for)
- picture wire & 4 screws
- 2 Mason Jars
- twine
- 2 hooks (coat hanger hooks work great)
- floral decor for each mason jar
- battery operated tea lights or fairy lights
Step One
- You can go to your local hardware store and purchase 1 long board and cut down to 1ft in length for each. If your purchase your board from Home Depot or Lowes they will cut it to the size you need. Most craft stores will sell the boards you need already sanded and ready to either paint or stain. If you purchased your board from a hardware store you more than likely will need to smooth the edges of your board.
- Use your sand paper to smooth out any roughness on your board and around the edges. This does not take much effort and gives it a softer look to the boards and prevents any pesky splinters.
Step Two
- You will now paint your boards. I used chalk spray paint. I applied three coats to my boards. After they were completely dry I took sand paper and sanded areas on the boards to give it a rustic appeal. This is all up to you and what look you are going for. If you like that look then use the sand paper to scuff up your paint, if you like them all white or whatever color you chose then you will stop after the paint is dry. There is not right or wrong way to do this step.
Step Three
- Turn your boards over and apply 2 screws to each board evenly. Do not screw in each screw total to the board. Allow space between the board and screw to wrap your picture wire around your screws. After your picture wire is secured, tighten the screws to the board.
Step Four
- Flip your boards back to the front and now you can install your hooks which will hold your mason jars.
- Keep in mind that when you are installing the hooks onto your boards you will want to position them in a place where your jar will not hang over the end of the board or to high on the board.
Step Five
- You can use any jars that you would like to use just as long as they have a neck to tie the twine around and hang your mason jar from. I used mason jars for mine because I like the country look it gives. Wrap your twine around the neck of your mason jar several times and tie into a bow.
- Cut another piece of twine off to attach to the twine you just wrapped around your jar. I measured the length of the twine so that when I hung the jars from the hooks they would not hang lower than the end of the board. I put floral décor in each mason jar. This is also very optional. There are so many ideas you can use here.
- Now your done and can hang your jars from your hooks. I put battery operated tea lights in both jars; however, you can use fairy lights if you desire. I find the fairy lights shine brighter in the dim light. It also gives a twinkling look to your décor.
Related Posts
Post a Comment
You must be logged in to post a comment.