DIY Outdoor Chandelier
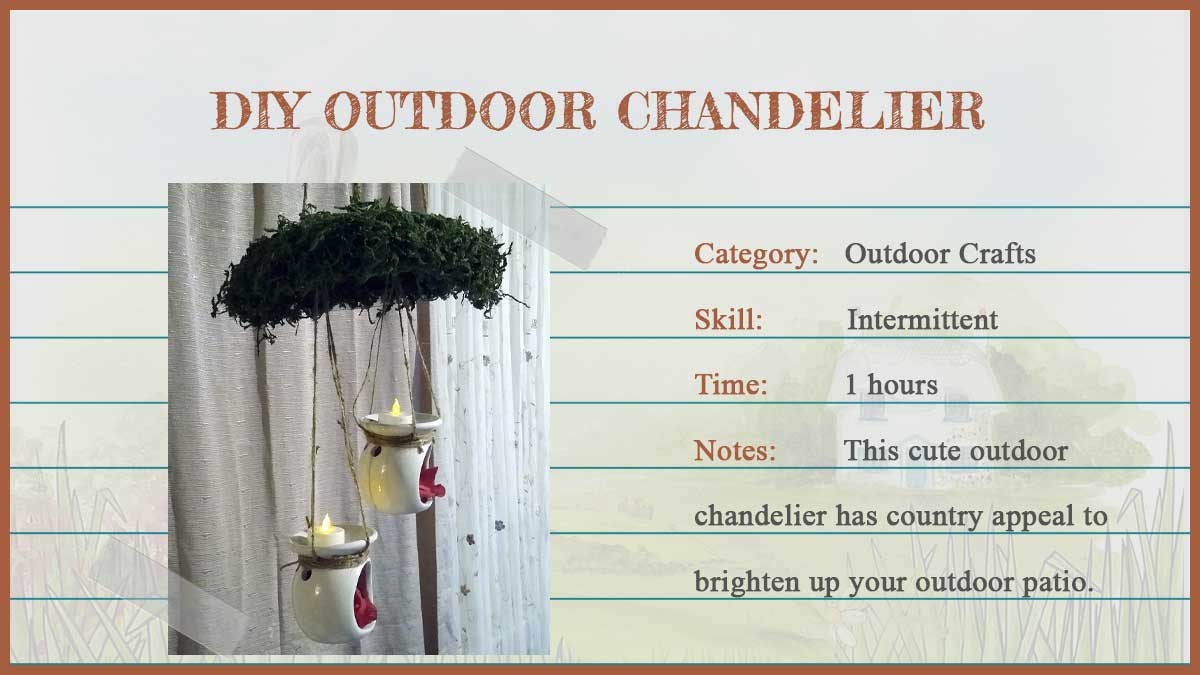
This cute outdoor chandelier has country appeal to brighten up your outdoor patio or gazebo. The farmhouse look of the moss top and hanging warmers bring such a warm look to my space.
The tealight candles will create a warm glow and the flowers bring such a pretty accent. I love to sit outside and have a cup of coffee admiring my creation. You can give this chandelier your own personal touch and bring your own style to life. Anything can be used as your top which makes the possibilities are endless.
How to Make Your Outdoor Chandelier
Materials Needed
- plastic bowl from the party section at your local store
- twine
- 2 wax sense warmers
- battery operated tealight candles
- artificial flowers
- artificial moss
- spray adhesive
- glue gun
- drill

Time needed: 1 hour.
Outdoor Chandelier
- Step One
Using your drill make six holes in the top of your plastic bowl. Four of the holes will be to insert your twine to hang from the ceiling and the other two will be to hang your wax sense warmers from.
Note: Be careful to not press too hard on your plastic bowl when drilling your holes because you will crack the plate.
- Step Two
Cut four pieces of twine of equal length to hang your chandler from the ceiling and four pieces of twine of different left to hang your wax sense warmers from the bowl. Coming from the bottom of the bowl pull your four pieces of twine through the holes and tie knots at the end to ensure the twine does not come out of the holes.

- Step Three
Next, you will need to pull the four pieces of twine through the holes coming from the top of the bowl. Once they are through the holes tie them off in knots as well. This will be used to secure your warmers to the top of your chandelier. Follow this step for each warmer.

- Step Four
Spay sections of your bowl with the adhesive glue and apply moss generously. Once the entire bowl is covered with moss use your hot glue gun to apply larger amounts of moss to the sections you missed.

- Step Six
You can now cut your flowers off the stem and insert them into the warmer and place the tealight on top. I did not glue either of these down. I want to allow them to be changed if needed.

- Step Five
Cut two feet of twin off and wrap around the neck of your warmers. Tie the four pieces you pulled through the top of the bowl to the twine and spaced evenly apart so when you wrap the two-foot-long twine around the neck of the wax warmer it will hold up evenly. Continue to wrap the twin around and tie off. Do this to both warmers.

Related Posts
Post a Comment
You must be logged in to post a comment.