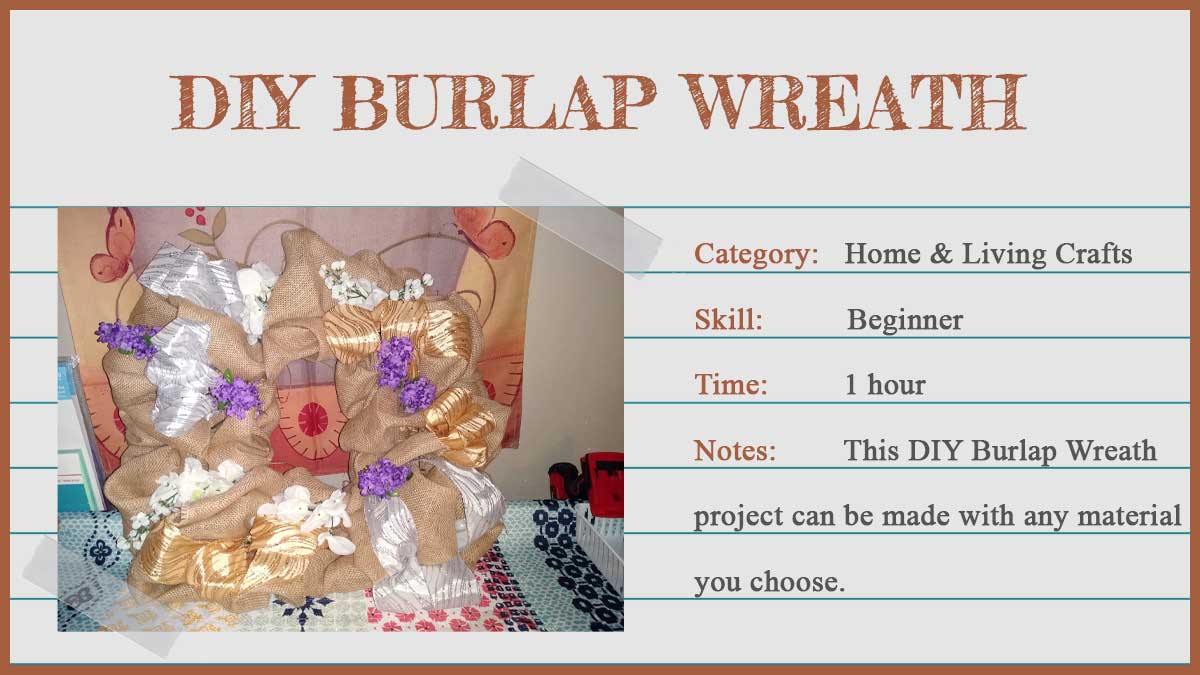
Burlap Flower Wreath
The burlap ribbon flowers on this wreath make it look unique and crafty. I like the simplicity of its appearance and the creative feel it brings to the room. The burlap flowers are easy to make and adding the green leaves brings that finishing touches. Adding a sign to your wreath if you are using a large frame will bring a more full appearance; however, a smaller wreath will allow you to decorate with just the flowers and bows. Whichever you decide, I’m sure that it will turn out beautiful.
Materials Needed for Burlap Flower Wreath:

- 3 Different Colors of Burlap Ribbon 2 inch wide (1 color for your flowers, 1 color for your leaves and 1 color for your bow)
- Hot Glue Gun
- Scissors
- Wicker Wreath Frame
- Sign
- Spray Paint
- Wire or Burlap String
Time needed: 1 hour and 30 minutes.
Burlap Flower Wreath
- Step One:
Spray paint your sign and set to the side to allow time to dry.

- Step Two:
Starting with your ribbon you chose to make your burlap flowers cut it into 15 inch length strips. At the end of the ribbon, fold the corner of your ribbon down and twist the point of your corner inward. Then fold top of the ribbon down away from you and twist your ribbon inward again. Keep doing this until all your flower is formed. Using your hot glue gun, hot glue the folds of your ribbon together until you don’t need to hold the flower in place anymore. Once the hot glue is dry set your flower to the side and move on to making more flowers.
Note: Watching the tutorial on how to make your burlap flowers will in help understanding the steps.
- Step Three:
Now using the burlap ribbon you chose for your leaves, cut the burlap into the shape of a leaf and hot glue as many as you would like to your flowers.
- Step Four:
To make your bow, use the burlap ribbon you chose and cut 3 different lengths (12 inches, 10 inches and 8 inches). Hot glue the edges of each strip together to make 3 different loops. Once the glue is dry flatten them out and lay them on top of one another with the largest loop on the bottom and the smallest on top. Pinch the center of the ribbon between your thumb and index finger. Pull the bottom edge up and the top edge down to give it a bow tie appearance. Using either wire or burlap ribbon tie it around the center where you are pinching the ribbon together. Once fully secure, cut a 5 inch length piece of ribbon and fold it in half long ways. Wrap it around the center of the bow tie and hot glue it to your bow. Now cut 2 more pieces of ribbon to 5 inches in length and glue to the back of your bow tie.
- Step Five:
After you sign is completely dry apply it to the center of your wreath and hot glue to down. Once your sign is secure to your wreath frame, begin to arrange your flowers around your wreath where desired and using hot glue secure each of the flowers around your wreath. Once your flowers are all on the wreath you are completely done. Find that special place to hang it and stand back to admire.

Related Posts
Post a Comment
You must be logged in to post a comment.